Posted by Fiona Dunne
on July 12, 2025
🤞🏽Mastering Fake Tan Application: Techniques for Every Skin Tone
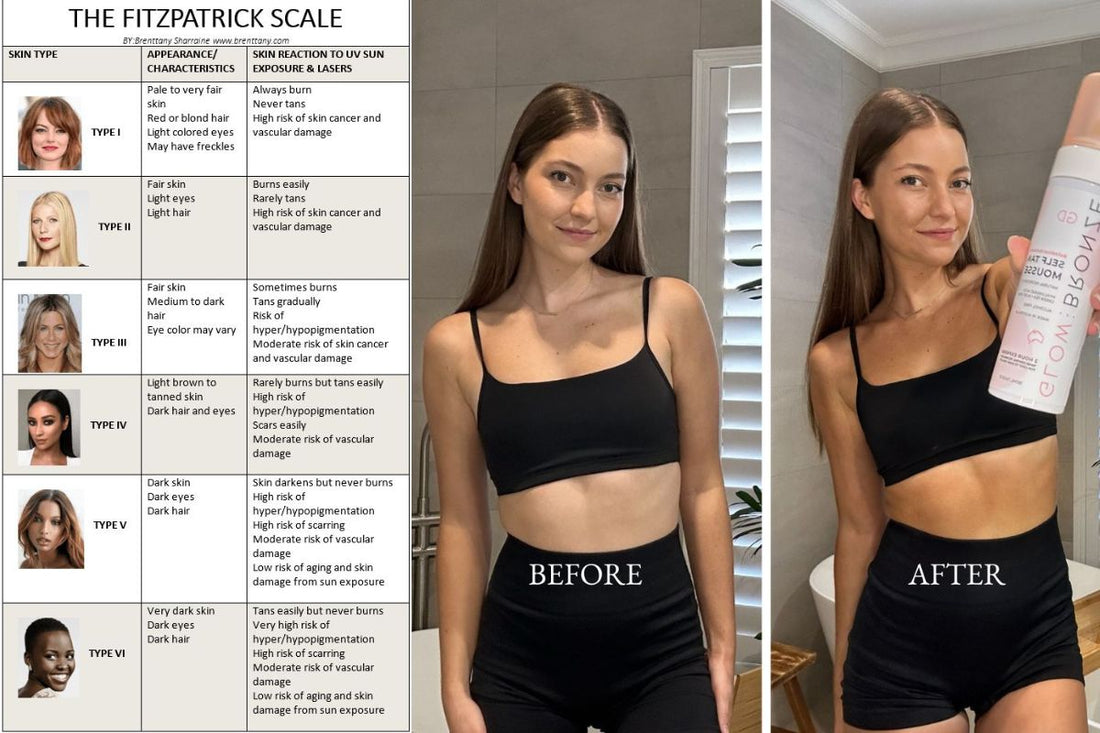
Achieving a natural-looking fake tan can be challenging, especially when considering the various skin tones. In this article, we'll provide comprehensive tips and product recommendations for fair, medium, and dark skin tones. If you want to get super technical here, look at the chart below, it's the Fitzpatrick scale and shows in detail your skin type which can really really help you master your fake tan choice.

🗝️ Preparation is Key
Before applying any fake tan product, it's essential to prepare your skin. Exfoliate your skin thoroughly to remove dead skin cells (and old fake tan if your serial tanner), paying attention to areas like elbows, knees and ankles. Moisturise your skin in those areas, but avoid applying moisturiser on the day of application. In short, remove old tan, dead skin cells and lightly moisturise so you skin is prepped nicely.
✌🏻Fair Skin Tone - Type 1 and 2
For fair skin tones, it's best to use a light to medium shade of fake tan. The reason for this si that you honestly, dont wanna over do it. Your skin is naturally pale and to avoid an orange looking hue, a light to medium tan works well. A green or chocolate base is perfect for Type 1and Type 2 skin tones. Avoid over-applying, as this can lead to an unnatural look so one light layer is plenty. Ensure you follow the timelines especially if the tan is a rapid tan that will develop faster. I've got the pale Irish skin and our GlowBronze Natural Self Tan Mousse is great left on for 2-4 hours. This is a chocolately brown base which means you don't look green or a slightly odd colour while your tan is developing which is a major win if your busy with things to do!

🤚🏽Medium Skin Tone - Type 3 and 4
Medium skin tones can pull off a variety of shades, from light to dark. Start with a light shade and gradually build up the colour. Remember to blend well and avoid over-applying. If its a rapid tan, i.e one that develops quick be sure to follow the rinse instructions, however your skin tone would be more forgiving than fair. Choosing a self tan with a guide colour is a good idea so you can physically see where the product is going and gives a quick colour pay off. If using our GlowBronze Natural Self Tan Mousse leave on for 4 hours for a medium glow or a little darker if your desire.

🤙🏿 Dark Skin Tone
For dark skin tones, a deeper shade of fake tan can enhance your natural glow. Apply a small amount and blend well, focusing on areas that naturally tan first, like the face and arms. Ensure good prep to avoid build up of tan and again choosing a tan with a guide colour can help achieve flawless results. You can defiantely go a little darker so if using GlowBronze Natural self tan Mousse you can sleep in it or even go 6 plus hours.

➕Additional Tips
- Always read the instructions and follow the recommended application guide - i.e if it says to rinse in 2 hours do that especially if your fair toned, you don't want it to over develop!.
- Do a patch test before applying any new product - I never do this but if your skin is slightly sensitive there is no harm to patch test.
- Blend, blend, blend! This is key to a natural-looking fake tan - we DO NOT want streaks, instead a flawless result that literally looks real and will get you the compliments lol.
- Moisturise your skin after 24 hours (this is how long most tans actually take to fully develop) to maintain the colour and health of your skin.
- Always use a tanning mitt and a blending brush over your feet, hands and decolatage.
By following these tips and using the right self tanning products for your skin tone, you can achieve a natural-looking self tan that enhances your natural glow and won't appear as fake. If this sounds too true to believe, honestly I know you got this and GlowDry is here to help!!!!
Leave us any comments or questions we are here to help and hope this article has helped you a little bit.
Shop our range of Self Tan and Accessories here if your interested: https://glowdryaustralia.com.au/collections/all-items